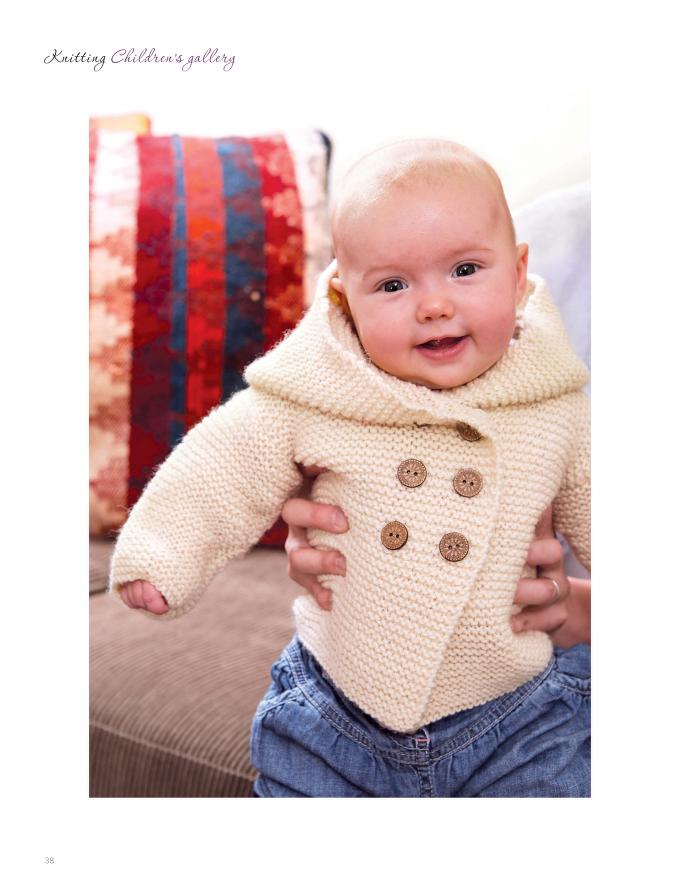
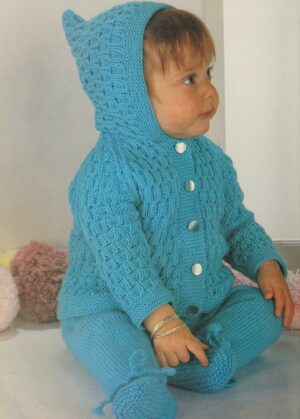
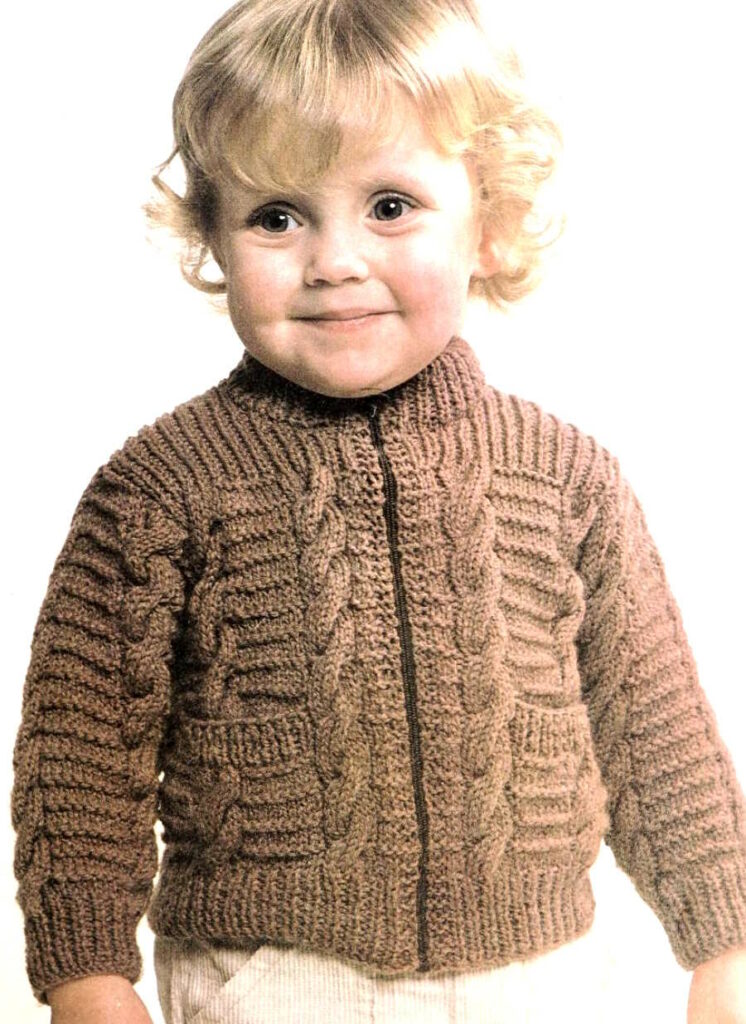
Wrap your child in warmth and timeless style with this beautiful Aran-style jacket knitting pattern. Designed for sizes to fit chests from 20 to 26 inches (approximately 1-5 years), this pattern combines classic cable designs with practical features. You’ll create a comfortable, heirloom-quality garment with a zip-up front for easy dressing, handy pockets, and a snug ribbed neckband. The pattern provides step-by-step instructions, clear abbreviations, and guidance for all skill levels from confident beginners onwards. (This is rewritten from a vintage knitting pattern with from the early 80’s, better formatting and additional notes added).
Materials:
- Yarn: PETER PAN Darling Baby Quick. 7 (8, 10, 12) x 20g balls. (The numbers in parentheses represent different sizes.)
- Needles:
- One pair 4mm needles (US size 6 / UK size 8) (Larger Needles)
- One pair 3.25mm needles (US size 3 / UK size 10) (Smaller Needles)
- Cable Needle: (Abbreviated as CN)
- Zip Fastener: Open-ended, to fit the front opening.
- Size 1: To fit chest 50 cm (20 inches) – This would likely fit a child around 1-2 years old, but it’s highly dependent on the individual child’s growth.
- Size 2: To fit chest 55 cm (22 inches) – This would likely fit a child around 2-3 years old.
- Size 3: To fit chest 60 cm (24 inches) – This would likely fit a child around 3-4 years old.
- Size 4: To fit chest 65 cm (26 inches) – This would likely fit a child around 4-5 years old.
Measurements:
- To Fit Chest: 50 (55, 60, 65) cm / 20 (22, 24, 26) inches.
- Finished Chest: 56 (62, 66, 72) cm / 22 (25, 26, 29) inches.
- Length (from back of neck): 33 (39, 44, 47) cm / 13 (15, 17.5, 18.5) inches (approximately).
- Sleeve Seam: 20 (24, 28, 32) cm / 8 (9.5, 11, 12.5) inches.
Abbreviations:
- K: Knit
- P: Purl
- St(s): Stitch(es)
- Rep: Repeat
- Inc: Increase (in this pattern, it means to knit or purl into the front and back of the same stitch, creating a new stitch)
- Beg: Beginning
- C8B: Cable 8 Back – Slip the next 4 sts onto a cable needle and hold at the back of the work, knit the next 4 sts from the left-hand needle, then knit the 4 sts from the cable needle.
- K2tog: Knit two stitches together (a decrease)
- St st: Stockinette stitch (Knit one row, Purl one row)
- Rem: Remain/Remaining
- RS: Right side
- WS: Wrong side
- CN: Cable Needle
Tension (Gauge):
- 11 sts and 16 rows = 5 cm (2 inches) measured over the ridge pattern using the larger needles. It’s crucial to check your tension to ensure the finished garment is the correct size.
Cable Panel (Worked over 10 sts):
- Row 1: P1, k8, p1.
- Row 2: K1, p8, k1.
- Row 3: P1, k8, p1.
- Row 4: K1, p8, k1.
- Row 5: P1, C8B, p1.
- Row 6: K1, p8, k1.
- Row 7: P1, k8, p1.
- Row 8: K1, p8, k1.These 8 rows form the Cable Panel.
Aran Jacket Knitting Pattern for Kids and Toddlers
Back:
- Cast On: Using the smaller needles, cast on 63 (69, 75, 81) sts.
- Ribbing:
- Row 1: K1, * p1, k1; rep from * to end.
- Row 2: P1, * k1, p1; rep from * to end.
- Rep these last 2 rows until the ribbing measures 4 (4, 5, 5) cm / 1.5 (1.5, 2, 2) inches, ending with a Row 1 (RS row).
- Increase Row (WS): Rib 9 (9, 10, 10), inc in each of the next 4 sts, [rib 10 (12, 13, 15), inc in each of the next 4 sts] twice, rib 9 (11, 13, 15), inc in each of the next 5 (5, 4, 4) sts, rib 8 (8, 10, 10). 80 (86, 91, 97) sts.
- Change to Larger Needles & Begin Pattern:
- Row 1 (RS): K8 (8, 9, 9), work Row 1 of Cable Panel across the next 10 sts, [k8 (10, 11, 13), work Row 1 of Cable Panel across the next 10 sts] 3 times, k8 (8, 9, 9).
- Row 2 (WS): P8 (8, 9, 9), work Row 2 of Cable Panel, [p8 (10, 11, 13), work Row 2 of Cable Panel] 3 times, p8 (8, 9, 9).
- Row 3: As Row 1, but working Row 3 of the Cable Panel.
- Row 4: As Row 1, but working Row 4 of the Cable Panel.
These 4 rows form the Ridge Pattern.
- Continue in Pattern: Continue in pattern, maintaining the Cable Panel sequence, until the back measures approximately 20 (25, 28, 30) cm / 8 (9.75, 11, 11.75) inches, or the desired length to the armholes, ending with a 4th (4th, 2nd, 8th) row of the Cable Panel.
- Shape Armholes:
- Keeping the pattern correct, cast off 8 (8, 9, 9) sts at the beg of the next 2 rows. 64 (70, 73, 79) sts rem.
- Work 10 (10, 12, 14) rows straight, ending with an 8th row of the Cable Panel (4th row of the Ridge Pattern).
- Decrease Row (RS): K7 (8, 23, 25), [k2tog, k10 (11, 23, 25)] 4 (4, 1, 1) times, k2tog, k7 (8, 23, 25). 59 (65, 71, 77) sts rem.
- Next Row (WS): K1, * p1, k1; rep from * to end.
- Continue in Rib: Work straight in rib (as established in the previous row) until the armholes measure 11 (12, 14, 15) cm / 4.25 (4.75, 5.5, 6) inches, ending with a WS row.
- Shape Shoulders:
- Cast off 6 (6, 7, 8) sts in rib at the beg of the next 4 rows.
- Cast off 5 (7, 7, 7) sts in rib at the beg of the following 2 rows.
- Slip the rem 25 (27, 29, 31) sts onto a stitch holder for the neckband.
Left Pocket Lining:
- Cast On: Using the larger needles, cast on 18 (20, 20, 22) sts.
- Work in St st: Work 16 (16, 16, 24) rows in stockinette stitch (st st), beginning with a knit row.
- Increase Row: P9 (11, 12, 14), inc in each of the next 4 sts, p5 (5, 4, 4). 22 (24, 24, 26) sts.
- Break Yarn: Break the yarn and slip the stitches onto a stitch holder.
Left Front:
- Cast On: Using the smaller needles, cast on 31 (35, 37, 39) sts.
- Ribbing:
- Row 1 (Side Edge): * K1, p1; rep from * to the last 3 sts, k3.
- Row 2: K2, p1, * k1, p1; rep from * to end.
- Rep these last 2 rows until the ribbing measures 4 (4, 5, 5) cm / 1.5 (1.5, 2, 2) inches, ending with a Row 1.
- Increase Row: K2, rib 3 (4, 4, 5), inc in each of the next 4 sts, rib 9 (12, 13, 14), inc in each of the next 5 (4, 4, 5) sts, rib 8 (9, 10, 9). 40 (43, 45, 48) sts.
- Change to Larger Needles & Begin Pattern:
- Row 1 (RS): K8 (8, 9, 9), * work Row 1 of Cable Panel across the next 10 sts, k8 (10, 11, 13), rep from * once more, k4 (5, 5, 6).
- Row 2 (WS): K2, p2 (3, 3, 4), * work Row 2 of Cable Panel, p8 (10, 11, 13), rep from * once more, p8 (8, 9, 9).
- Row 3: As Row 1, but working Row 3 of the Cable Panel.
- Row 4: K4 (5, 5, 6), * work Row 4 of Cable Panel, k8 (10, 11, 13), rep from * once more, k8 (8, 9, 9).
- Rep the last 4 rows 3 (3, 3, 5) times more, maintaining the Cable Panel sequence, ending with an 8th row of the Cable Panel.
- Place Pocket:
- Next Row (RS): Work 9 (9, 10, 10) sts, [k2tog, k1] twice, k2tog, work 23 (26, 27, 30) sts. 37 (40, 42, 45) sts rem.
- Next Row (WS): Work 14 (15, 15, 16) sts, slip the next 19 (21, 21, 23) sts onto a holder for the pocket edging, work across the 22 (24, 24, 26) sts of the left pocket lining, work 4 (4, 6, 6) sts. 40 (43, 45, 48) sts.
- Continue in pattern until the front measures the same as the back to the armhole shaping, ending with a 4th (4th, 2nd, 8th) row of the Cable Panel.
- Shape Armhole:
- Keeping the pattern correct, cast off 8 (8, 9, 9) sts at the beg of the next row (armhole edge). 32 (35, 36, 39) sts rem.
- Work 11 (11, 13, 15) rows straight, ending with an 8th row of the Cable Panel.
- Decrease (1st, 2nd, 3rd sizes ONLY):
- Next Row (RS): K5 (8, 11), [k2tog, k5 (7, 11)] 3 (2, 1) times, k2tog, k4 (7, 10).
- Decrease (4th size ONLY):
- Next Row (RS): Knit to end, decreasing 1 st at the center.
- All Sizes – Continue: 28 (32, 34, 38) sts rem.
- Next Row (WS): K2, * p1, k1; rep from * to end.
- Continue with Garter Stitch Edge:
- Keeping 2 sts at the front edge in garter stitch (every row knit) and the remainder in rib, work straight until the front is 11 (13, 15, 15) rows shorter than the back to the start of the shoulder shaping, ending at the front edge.
- Shape Neck:
- Next Row: Work 6 (7, 7, 9) sts, slip these sts onto a safety pin for the neckband, work to end.
- Keeping the rib correct, dec 1 st at the neck edge on the next 3 rows, then on every alt row until 17 (19, 21, 23) sts rem.
- Work 3 (3, 5, 5) rows straight, ending at the armhole edge.
- Shape Shoulder:
- Cast off 6 (6, 7, 8) sts in rib at the beg of the next and following alt row.
- Work 1 row.
- Cast off the rem 5 (7, 7, 7) sts.
Right Pocket Lining:
- Work as for the Left Pocket Lining.
- Important: Follow the instructions and stitch counts exactly as for the Left Pocket Lining. The note in the original pattern about using italicized numbers only applies to the placement on the Right Front.
Right Front:
- Cast On: Using the smaller needles, cast on 31 (35, 37, 39) sts.
- Ribbing:
- Row 1 (Front Edge): K3, * p1, k1; rep from * to end.
- Row 2: P1, * k1, p1; rep from * to the last 2 sts, k2.
- Rep these last 2 rows until the ribbing measures 4 (4, 5, 5) cm / 1.5 (1.5, 2, 2) inches, ending with a Row 1.
- Increase Row: Rib 8 (9, 10, 9), inc in each of the next 5 (4, 4, 5) sts, rib 9 (12, 13, 14), inc in each of the next 4 sts, rib 3 (4, 4, 5), k2. 40 (43, 45, 48) sts.
- Change to Larger Needles & Begin Pattern:
- Row 1 (RS): K4 (5, 5, 6), * work Row 1 of Cable Panel across the next 10 sts, k8 (10, 11, 13), rep from * once more, k8 (8, 9, 9).
- Row 2 (WS): P8 (8, 9, 9), * work Row 2 of Cable Panel, p8 (10, 11, 13), rep from * once more, p2 (3, 3, 4), k2.
- Row 3: As Row 1, but working Row 3 of the Cable Panel.
- Row 4: K8 (8, 9, 9), * work Row 4 of Cable Panel, k8 (10, 11, 13), rep from * once more, k4 (5, 5, 6).
- Rep the last 4 rows 3 (3, 3, 5) times more, maintaining the Cable Panel sequence, ending with an 8th row of the Cable Panel.
- Place Pocket:
- Next Row (RS): Work 23 (26, 27, 30) sts, [k2tog, k1] twice, k2tog, work 9 (9, 10, 10) sts. 37 (40, 42, 45) sts rem.
- Next Row: Work 4(4-6-6) sts, slip next 19(21-21-23) sts onto a holder for pocket edging, work across sts of right pocket lining, work 14(15-15-16) sts. 40(43-45-48) sts.
- Continue in pattern until the front measures the same as the back to the armhole shaping, ending with a 4th (4th, 2nd, 8th) row of the Cable Panel (work 1 more row here compared to the Left Front).
- Shape Armhole:
- Keeping the pattern correct, cast off 8 (8, 9, 9) sts at the beg of the next row (armhole edge). 32 (35, 36, 39) sts rem.
- Work 11 (11, 13, 15) rows straight (work 1 less row here compared to the Left Front), ending with an 8th row of the Cable Panel.
- Decrease (1st, 2nd, 3rd sizes ONLY):
- Next row (decrease): K5(8-11), [k2tog, k5(7-11)] 3(2-1) times, k2tog, k4(7-10).
- Decrease (4th Size ONLY):
- Next Row: Knit to end, decreasing 1 st at the center.
- All Sizes Continue: 28 (32, 34, 38) sts remain.
- Next Row (WS): * K1, p1; rep from * to the last 2 sts, k2.
- Continue with Garter Stitch Edge:
- Keeping 2 sts at the front edge in garter stitch (every row knit) and the remainder in rib, work straight until the front is 11 (13, 15, 15) rows shorter than the back to the start of the shoulder shaping (work 1 more row here compared to the Left Front), ending at the front edge.
- Shape Neck:
- Next Row: Work 6 (7, 7, 9) sts, slip these sts onto a safety pin for the neckband, work to end.
- Keeping the rib correct, dec 1 st at the neck edge on the next 3 rows, then on every alt row until 17 (19, 21, 23) sts rem.
- Work 3 (3, 5, 5) rows straight, ending at the armhole edge.
- Shape Shoulder:
- Cast off 6 (6, 7, 8) sts in rib at the beg of the next and following alt row.
- Work 1 row.
- Cast off the rem 5 (7, 7, 7) sts.
Sleeves (Make Two):
- Cast On: Using the smaller needles, cast on 35 (39, 41, 43) sts.
- Ribbing:
- Row 1: K1, * p1, k1; rep from * to end.
- Row 2: P1, * k1, p1; rep from * to end.
- Rep these last 2 rows until the ribbing measures 4 (4, 5, 5) cm / 1.5 (1.5, 2, 2) inches, ending with a Row 1.
- Increase Row: Rib 2 (2, 2, 1), inc in each of the next 5 (5, 5, 6) sts, rib 8 (10, 11, 12), inc in each of the next 5 sts, rib 8 (10, 11, 12), inc in each of the next 5 (5, 5, 6) sts, rib 2 (2, 2, 1). 50 (54, 56, 60) sts.
- Change to Larger Needles & Begin Pattern:
- Row 1 (RS): K2, work Row 1 of Cable Panel across the next 10 sts, [k8 (10, 11, 13), work Row 1 of Cable Panel across the next 10 sts] twice, k2.
- Row 2 (WS): P2, work Row 2 of Cable Panel, [p8 (10, 11, 13), work Row 2 of Cable Panel] twice, p2.
- Row 3: As Row 1, but working Row 3 of the Cable Panel.
- Row 4: As Row 1, but working Row 4 of the Cable Panel.
These 4 rows form the pattern.
- Continue and Increase: Keeping the continuity of the cable panels correct, work 2 more rows. Bringing extra sts into the ridge pattern, inc 1 st at each end of the next and every following 7th (8th, 6th, 7th) row until there are 62 (68, 76, 80) sts.
- Work Straight: Work straight until the sleeve measures 20 (24, 28, 32) cm / 8 (9.5, 11, 12.5) inches, or the required seam length, ending with a WS row.
- Mark Seam: Tie a marker at each end of the last row to mark the end of the sleeve seam.
- Continue and Cast Off: Work 12 (12, 13, 13) more rows. Cast off in pattern.
Finishing and Neckband:
- Press Pieces: Press the pieces gently, following any yarn care instructions.
- Join Shoulder Seams: Join the shoulder seams neatly.
- Neckband:
- Slip the sts on the safety pin at the right front neck onto a smaller needle. Rejoin the yarn, and with the RS of the work facing, pick up and knit 16 (17, 19, 19) sts evenly up the right front slope.
- Work across the sts on the holder at the back neck as follows: rib 2 (4, 4, 4), k3tog, rib 5 (5, 5, 7), k3tog, rib 7 (5, 7, 7), k3tog, rib 2 (4, 4, 4).
- Pick up and knit 16 (17, 19, 19) sts evenly down the left front slope.
- Work across the sts on the safety pin at the left front neck. 63 (69, 75, 81) sts.
- Row 1: K2, purl to the last 2 sts, k2.
- Row 2: K3, * p1, k1, p1; rep from * to the last 3 sts, k3.
- Row 3: K2, * p1, k1, p1; rep from * to the last 2 sts, k2.
- Rep the last 2 rows until the neckband measures 7 (7, 8, 8) cm / 2.75 (2.75, 3, 3) inches.
- Slip the sts onto a length of yarn.
- Pocket Edgings (Make Two):
- Using the smaller needles and with the RS of the work facing, knit across the sts of one pocket opening. 19 (21, 21, 23) sts.
- Work 5 rows in k1, p1 rib as for the Back, starting with the 2nd row of the rib pattern.
- Cast off in rib.
- Work the other pocket edging in the same way.
- Fold and Stitch Neckband: Fold the neckband in half to the inside and slip stitch it loosely in place, allowing for stretch and ensuring you catch every stitch.
- Join Seams: Join the side seams. Join the sleeve seams up to the markers.
- Insert Sleeves: Insert the sleeves, matching the center of the sleeve cap to the shoulder seam.
- Sew Pocket Linings and Edgings: Sew the pocket linings and edgings in place neatly.
- Press Seams: Press the seams.
- Sew in Zip: Sew in the zip fastener.